Introduction
Neon signs are a blend of artistry and technology, combining creative design with intricate manufacturing processes. These glowing signs have been a staple in advertising and decor for decades, capturing attention with their vibrant colours and unique designs. With the advent of LED technology, the process of making neon signs has evolved, offering new possibilities for customization and durability. This article will delve into the detailed manufacturing process of both traditional and LED neon signs, with a focus on how custom neon signs are produced to meet specific design requirements.
The Traditional Neon Sign Manufacturing Process
Traditional neon signs have been crafted by skilled artisans for over a century. The process involves several meticulous steps that transform simple glass tubes into eye-catching neon lights. Here's how it's done:
1. Designing the Neon Sign
The first step in making a neon sign is to create a design. This can range from simple text to complex logos or artistic illustrations. The design is typically created using graphic design software and then printed out to serve as a template for shaping the glass tubes.
2. Shaping the Glass Tubes
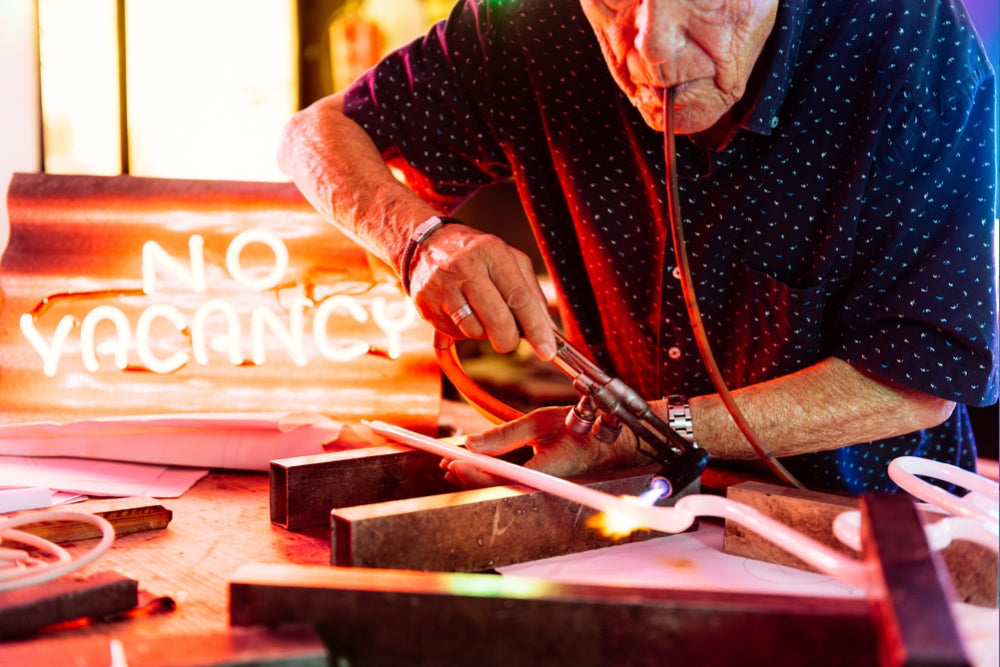
Once the design is finalised, glass tubes are carefully heated and bent to match the template. This is one of the most challenging aspects of neon sign production, requiring precision and skill. The glass is heated over a gas burner until it becomes pliable, and then it's quickly shaped using tools and hand movements. Each bend and curve must be accurate to ensure that the sign lights up correctly and looks as intended.
3. Attaching Electrodes
After the glass tubes are shaped, electrodes are attached to both ends of each tube. These electrodes are essential for conducting electricity through the tube, which will excite the gas inside and produce light. The attachment process involves heating the ends of the tubes and then fusing the electrodes onto them.
4. Gas Filling
Once the electrodes are in place, the air inside the glass tubes is evacuated using a vacuum pump. The tubes are then filled with a noble gas, such as neon or argon. Neon gas produces a bright red-orange light, while argon, typically combined with a small amount of mercury, emits a soft blue glow. The specific colour of the light can be further altered by using different phosphor coatings on the inside of the tubes or by mixing gases.
5. Sealing and Testing
After the tubes are filled with gas, they are sealed off, and the entire system is tested. The tubes are connected to a high-voltage power source, which ionizes the gas inside, causing it to emit light. This process, known as "striking the tube," allows the manufacturer to check for any defects in the glass, gas pressure, or electrode connections. Any issues must be corrected before moving on to the final assembly.
6. Assembly and Mounting
Once the individual tubes are shaped, filled, and tested, they are assembled into the final design. The tubes are usually mounted onto a frame or backing material, often made of metal, wood, or acrylic. The mounting process involves securing the glass tubes with specialized clips or supports to ensure they remain stable and aligned. The tubes are then wired together, with each section connected to a transformer that provides the necessary voltage to power the sign.
7. Installation and Finishing
The final step in the process is installing the neon sign in its intended location. Whether it’s a storefront, interior space, or outdoor advertisement, the sign must be securely mounted and connected to a reliable power source. Additional finishing touches, such as protective covers or weatherproofing for outdoor signs, may be added to enhance the sign's durability and appearance.
The Modern LED Neon Sign Manufacturing Process
With the advent of LED technology, the process of making neon signs has become more accessible and versatile. LED neon signs mimic the look of traditional neon but are made using flexible LED strips encased in durable tubing. Here's how custom neon signs are produced using LED technology:
1. Designing the LED Neon Sign
Similar to traditional neon signs, the process begins with a design. However, LED neon signs offer greater flexibility in terms of shapes, colours, and effects. The design is created digitally, allowing for easy modifications and precise measurements. Once finalised, the design is printed or displayed on a screen to serve as a guide for the next steps.

2. Cutting and Shaping the LED Strips
The LED strips are then cut to the required lengths based on the design. These strips are made of flexible, durable material that can be bent and shaped to match intricate patterns or lettering. Unlike glass, which is fragile and requires careful handling, LED strips are more forgiving, making them easier to work with, especially for complex or custom designs.

3. Mounting on an Acrylic Backboard
Once the LED strips are shaped, they are mounted onto an acrylic backboard. This backboard serves as both a support structure and a surface for displaying the sign. The LED strips are attached to the backboard using adhesive or small clips, ensuring they stay in place and maintain their shape. The backboard itself can be clear, coloured, or even UV printed to enhance the overall appearance of the sign.

4. Wiring and Power Supply
After the LED strips are secured, they are connected to a power supply. LED neon signs operate at a much lower voltage than traditional neon signs, making them more energy-efficient and safer to use. The wiring process involves connecting the ends of the LED strips to a transformer or driver, which converts standard electrical current into the appropriate voltage for the LEDs.

5. Testing and Quality Control
Once the wiring is complete, the LED neon sign undergoes a series of tests to ensure it functions correctly. This includes checking for consistent lighting, ensuring there are no flickering sections, and verifying that all connections are secure. Any issues that arise during testing are addressed before the sign is ready for delivery or installation.

6. Final Assembly and Packaging
The final assembly of an LED neon sign involves any additional finishing touches, such as adding protective covers or framing. The sign is then ready for installation, which is typically easier and quicker than installing traditional neon signs due to the lighter weight and lower power requirements of the LED components.


Advantages of LED Neon Signs
While traditional neon signs have a classic appeal, LED neon signs offer several advantages that make them a popular choice for custom neon signs:
- Durability: LED neon signs are made from durable, flexible materials like silicone, making them much more robust than fragile glass neon. This results in better resistance to breakage during transportation, installation, and everyday use, especially in high-traffic environments.
- Energy Efficiency: LED neon signs consume a fraction of the electricity compared to glass neon signs, offering significantly lower operating costs. This energy efficiency not only saves on utility bills but also reduces the environmental footprint, contributing to sustainability.
- Longevity: LED neon signs typically last up to 50,000 hours or more, often 10 times longer than glass neon. This extended lifespan lowers the need for frequent replacements and minimizes long-term maintenance costs, making them a more reliable and cost-effective solution.
- Flexibility: LED neon technology offers superior flexibility in design, allowing for intricate shapes and smaller bend radii that glass neon simply cannot achieve. This flexibility opens up creative possibilities, including more detailed logos, artwork, and lettering for businesses or personal use.
- Safety: LED neon signs operate at low voltages and are made from non-toxic materials, unlike glass neon, which uses high-voltage electricity and hazardous gases like mercury. This makes LED neon a safer option for both indoor and outdoor use, reducing risks such as gas leaks, burns, or electric shocks.
- Heat Generation: LED neon signs generate very little heat compared to glass neon, making them safe to touch and ideal for temperature-sensitive environments, like indoor spaces or locations with children or pets.
- Customisation: LED neon signs offer extensive customisation options with a broader range of colours, including RGB and Spectrum lighting, which allows for dynamic lighting effects and colour transitions. Businesses can create custom lighting effects, such as fading, flashing, or alternating colours, giving them more creative control.
- Dimmable and Controllable: Many LED neon signs come with dimmable features, giving users the ability to adjust the brightness to fit their environment. With modern controllers, these signs can be connected to smart systems or remote devices, allowing for easy control over brightness, colour, and animations, enhancing user experience.
- Animations and Dynamic Effects: LED neon technology enables programmable lighting effects, including animations such as pulsing, chasing lights, or gradual colour changes. These features are particularly useful for businesses that want to grab attention or create an interactive experience with their signage.
- RGB and Spectrum Lighting: With RGB LEDs, LED neon signs can display a full spectrum of colours, offering more flexibility for brands that require multicoloured lighting options. Spectrum control enables smooth transitions between various shades, making it perfect for businesses that want eye-catching, dynamic signage.
- Smaller Signs: LED neon technology is ideal for creating smaller, more intricate signs that glass neon would struggle to achieve due to its rigidity and size limitations. This makes LED neon perfect for delicate, detailed designs, small-scale displays, or compact signage in tight spaces.
- Ease of Installation: Due to their lightweight and flexible nature, LED neon signs are easier and faster to install than their glass counterparts. The reduced fragility and lighter weight simplify installation, saving time and money while minimising the risk of damage.
- Maintenance: With a much longer lifespan and more durable construction, LED neon signs require far less maintenance than traditional glass neon, which can suffer from gas leaks, flickering, or broken glass. Fewer repairs mean lower costs over the lifetime of the sign.
- Environmental Impact: LED neon signs are more eco-friendly as they consume less energy and do not rely on toxic gases like argon or mercury. Their long lifespan also reduces waste, making them the more sustainable choice for businesses conscious of their environmental impact.
- Transportation: The lightweight and durable nature of LED neon signs makes them easier and cheaper to transport. Their resilience during shipping reduces the need for expensive, protective packaging and lowers the risk of breakage, leading to lower shipping costs and liability insurance.

Conclusion
The process of making neon signs, whether traditional or LED, is a fascinating blend of art and science. Traditional neon signs require skilled craftsmanship to shape and assemble glass tubes filled with glowing gases, while LED neon signs offer a modern, flexible alternative that caters to the demand for custom designs. Understanding the manufacturing process behind these luminous creations allows us to appreciate the intricate work involved and the technological advancements that have expanded the possibilities of neon signage. Whether you choose a classic neon look or opt for the versatility of LED, neon signs continue to be a timeless and impactful way to make a statement.